Mold & Hazardous Materials
How to Identify Early Signs of Mold Growth in Your Home
September 25, 202513 min read
E
Elsa Boyer· Regional Operations Manager (Harrisburg, PA)
Elsa Boyer is a Regional Operations Manager for Advanced Disaster Recovery, based in Harrisburg, Pennsylvania, overseeing commercial and healthcare restoration projects. She holds a Bachelor of Arts from Valparaiso University and a deep certification portfolio, including ICRA Certified Healthcare Remediator Supervisor and multiple IICRC designations across commercial drying, structural drying, water, and fire & smoke restoration.
Certified Healthcare Remediator Supervisor (ICRA), IICRC Commercial Drying Specialist, IICRC Applied Structural Drying, IICRC Water Restoration Technician (WRT), IICRC Fire and Smoke Restoration Technician, Lead-Based Paint Renovator, Mold Remediation Technician (RIA), OSHA 10 CertifiedLinkedIn
Published September 25, 2025 · Updated May 27, 2026

Learn how to spot early signs of mold growth and keep your home safe with our expert tips for DIY inspections.
What You'll Need
Gathering tools for detecting mold symptoms is the first step in your inspection process to prevent exposure. Understanding the signs of mold growth in your home is essential for maintaining healthy air conditions and avoiding exposure to harmful spores. Identifying mold symptoms is crucial to prevent health risks from spore exposure and costly damages.🔧 Tools:
Using appropriate tools can help you identify mold symptoms more effectively and minimize exposure to airborne spores.- Flashlight (bright LED preferred for spotting spore colonies)
- Moisture meter (optional but helpful, detects conditions that cause mold)
- Screwdriver (for removing outlet covers where air circulation is poor)
- Step ladder (for checking high areas where spores settle)
- Digital camera or phone (document exposure symptoms)
- Magnifying glass (for close inspection of spore patterns)
📋 Materials:
- N95 mask (hardware store - protects from spore exposure)
- Disposable gloves (latex or nitrile to prevent exposure)
- Plastic bags (for samples if symptoms are severe)
- Notepad and pen (track locations and conditions)
- Tape measure (measure areas showing symptoms)
⏱️ Time Required:
- ⏱️ Prep: 5 minutes
- ⏱️ Full inspection: 30-45 minutes
- ⏱️ Documentation: 10 minutes
⚠️ Safety Warning
This inspection is safe for DIY if:- You're only looking, not disturbing spores in the air
- Visible mold symptoms cover less than 10 square feet
- You have no severe allergies to mold exposure
- The area has good air ventilation to reduce spore concentration
- You see extensive black growth that could cause severe symptoms
- Recent sewage backup created conditions for toxic exposure
- You have compromised immunity to airborne spores
- Strong musty odor in the air causes health symptoms
- Wear protective gear to prevent spore exposure
- Avoid touching mold directly to prevent symptoms
- Keep children and pets away from air with spores
- Document everything about conditions you find
- Wash hands thoroughly after potential exposure
Step-by-Step Mold Inspection Process
Step 1: Start with Your Nose
- Walk through each room slowly. Mold spores produce a distinct musty smell in the air that can cause respiratory symptoms.
- Note any areas where the odor is stronger, indicating higher spore concentration.
- Check if smell intensifies when HVAC system runs, spreading spores through air ducts.
- Pay attention to closets and closed spaces where air doesn't circulate, creating ideal conditions.
Step 2: Visual Inspection - High-Risk Areas
- Under sinks: Look for discoloration symptoms where conditions are damp.
- Around windows: Check for black spore deposits on frames and sills.
- Bathroom corners: Inspect where walls meet ceilings - poor air flow causes growth.
- Basement walls: Look for white, fuzzy growth symptoms (efflorescence or spores).
- Attic: Check around roof penetrations where air leaks cause moisture conditions.
- Behind furniture: Pull out items against exterior walls where air doesn't circulate.
Attic & Crawlspace Inspection
These hidden areas often harbor the worst mold conditions due to poor air circulation and temperature extremes. In attics, check roof sheathing for dark staining indicating spore colonies, especially near soffit vents where warm air meets cold surfaces. Inspect insulation for discoloration symptoms - pink fiberglass turning gray or black signals serious exposure risk. Crawlspaces require checking floor joists for white or greenish spores, vapor barriers for standing water that causes growth, and foundation walls for efflorescence. Use proper protective equipment as these confined spaces concentrate spores in the air, increasing exposure symptoms. If you detect musty odors or see condensation, conditions exist for rapid mold growth requiring immediate attention.Ducts & Insulation Assessment
HVAC systems spread spores throughout your home when contaminated. Remove register covers to inspect for black or green growth inside ducts - if present, spores circulate every time the system runs, causing widespread exposure. Check flexible ductwork in unconditioned spaces where condensation causes ideal growth conditions. Examine insulation around ducts for water stains or discoloration symptoms indicating moisture infiltration. Fiberglass insulation that's compressed, stained, or emitting odors harbors spores and needs replacement. Paper-backed insulation is particularly vulnerable as spores feed on cellulose. If anyone experiences respiratory symptoms when HVAC operates, professional duct cleaning and mold testing of your air system is essential to prevent ongoing exposure.| Location | Warning Symptoms | Exposure Risk Level | Action Needed |
|---|---|---|---|
| Bathrooms | Black spores in grout, ceiling stains | High air contamination | Improve air ventilation |
| Basements | Musty air smell, white powder symptoms | High spore exposure | Check humidity conditions |
| Attics | Dark stains, poor air circulation | Medium exposure risk | Fix conditions that cause leaks |
| Windows | Condensation symptoms, black spores | Medium air quality issue | Reduce conditions causing humidity |
| Kitchens | Under-sink dampness causing growth | Medium exposure potential | Fix leak conditions immediately |
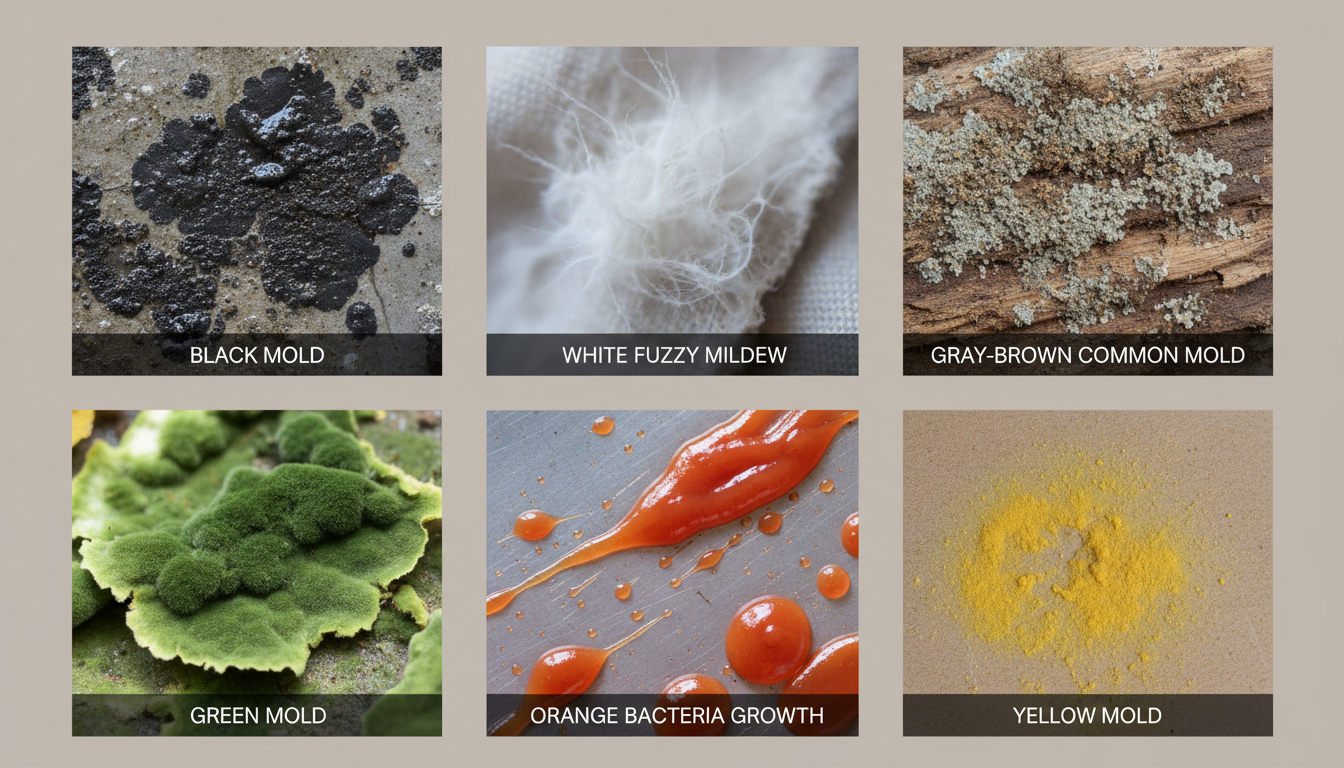
Step 3: Identify Different Mold Types by Appearance
Familiarizing yourself with various mold symptoms is important for understanding exposure risks and air quality conditions.- Black or dark green: Often Stachybotrys spores (toxic black mold) - severe exposure symptoms require immediate professional attention.
- White and fuzzy: Initial mold symptoms or mildew, easier to clean before spores spread through air.
- Gray or brown patches: Common household molds, check what conditions cause moisture.
- Orange or pink: Often bacteria, not mold spores, but indicates moisture conditions.
- Yellow or greenish: Aspergillus species spores, common where damp conditions cause growth.
Step 4: Check Hidden Areas
- Remove outlet covers on exterior walls where air doesn't flow well (power off first).
- Look behind wallpaper edges for discoloration symptoms from trapped spores.
- Lift carpet edges near exterior walls where conditions trap moisture.
- Check HVAC registers for unusual dust that might be spores in air system.
- Inspect washing machine hoses where leak conditions cause growth.
- Examine caulking around tubs for black spore symptoms from exposure to moisture.
Step 5: Test Moisture Levels
Testing for moisture conditions is key to confirming what causes mold symptoms and spore production.- Use moisture meter on suspicious walls where conditions might cause growth (normal is below 15%).
- Check multiple spots to understand air moisture conditions in each room.
- Test areas that feel cool where condensation conditions cause spore growth.
- Document readings above 20% - these conditions need attention to prevent exposure.
- Compare readings to known dry areas where air conditions are normal.
Step 6: Document Your Findings
- Photograph all areas showing symptoms with something for scale to assess exposure risk.
- Map locations where air quality conditions are compromised.
- Note any recent events that cause water conditions (leaks, flooding).
- Record dates to track how conditions and symptoms progress.
- Measure affected areas to determine exposure severity and if professional help is needed.
Understanding What You're Seeing
| Observation | Likely Cause | Spore/Exposure Risk | Immediate Action |
|---|---|---|---|
| Musty air smell only | Hidden spores growing | High exposure potential | Professional inspection |
| Water stain symptoms | Conditions from past leak | Medium air contamination | Check moisture conditions |
| Peeling paint | Moisture conditions in walls | Medium spore risk | Find what causes moisture |
| Warped flooring | Water conditions below | High exposure risk | Fix conditions immediately |
| Condensation symptoms | Poor air circulation | Medium spore growth | Improve air ventilation |
Troubleshooting Common Issues
Problem: Can't determine if it's mold spores or dirt
Solution: Dab the spot with diluted bleach (1:10 ratio). Mold symptoms will lighten within minutes; dirt won't change. Don't use this test on large areas to avoid spore exposure through air.Problem: Musty smell in air but no visible symptoms
Solution: Check behind furniture, inside wall cavities, and HVAC ducts where air carries spores. The source causing exposure is often hidden. Consider professional inspection with thermal imaging to find conditions.Problem: Keep finding mold symptoms in same spot
Solution: You haven't addressed the moisture conditions that cause growth. Look for leaks above, behind, or below that create conditions for spores. Cleaning without fixing what causes moisture guarantees return.Problem: Unsure if exposure amount requires professional help
Solution: If mold symptoms cover more than 10 square feet (about 3x3 feet), call professionals. When spore exposure risk is unclear, err on the side of caution to protect air quality. If you see symptoms indicating spore growth, do not hesitate to seek professional help to prevent exposure.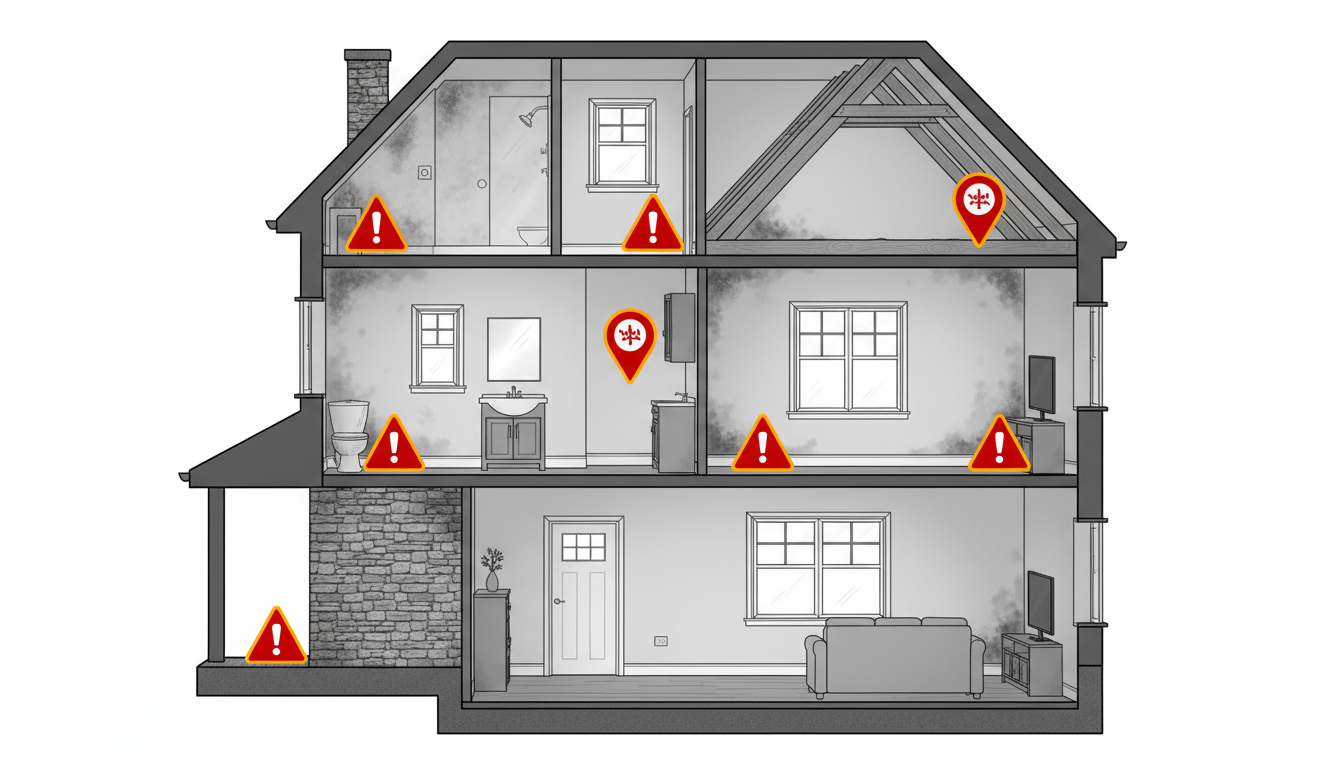
🔴 When to Call a Professional
If you notice symptoms of mold growth, it's time to take action to prevent exposure. Stop and call a mold remediation professional if: Recognizing mold symptoms in your home can save you from health conditions caused by spore exposure.- Mold symptoms cover more than 10 square feet
- Black mold spores are present anywhere in your air
- Mold is in HVAC system spreading spores through air ducts
- Water damage conditions occurred more than 48 hours ago
- Anyone in home has allergies causing symptoms from exposure
- You smell spores but can't locate what causes the odor
- Mold symptoms return after cleaning affected conditions
- Structural materials show spore growth affecting air quality
Preventing Future Mold Growth
Waterproofing Snapshot
Effective waterproofing is your first defense against conditions that cause mold. Exterior waterproofing includes maintaining gutters to direct water away, sealing foundation cracks where moisture infiltrates, and ensuring proper grading slopes away from your home. Interior measures involve applying waterproof sealants to basement walls, installing vapor barriers in crawlspaces, and using mold-resistant paint in high-humidity areas. Check window and door seals annually - even small gaps allow moisture that causes spore growth. French drains and sump pumps actively remove water before it creates conditions for mold. Remember, every dollar spent on waterproofing saves ten on mold remediation and prevents exposure symptoms for your family.Health Note: Understanding Exposure Symptoms
⚠️ Medical Advisory: Mold exposure causes various health symptoms ranging from mild to severe. Common symptoms include persistent coughing, sneezing, watery eyes, and skin irritation from spore contact. Prolonged exposure to toxic spores can cause chronic respiratory conditions, memory problems, and fatigue. Children, elderly, and immunocompromised individuals face higher risks - even small amounts of spores in air trigger severe symptoms. Black mold exposure particularly causes neurological symptoms including headaches and difficulty concentrating. If family members experience unexplained respiratory symptoms, chronic sinus infections, or worsening asthma, check for hidden mold. Document health symptoms alongside home inspection findings. Consult healthcare providers about exposure concerns, especially if symptoms improve when away from home but return upon re-entering - a clear sign your air contains harmful spores requiring immediate professional assessment. 🏠 Home Maintenance Tips to Prevent Spore Conditions:- Keep indoor air humidity below 50% to prevent conditions
- Fix leaks within 24 hours before they cause spore growth
- Run bathroom fans during and 30 minutes after showers to clear air
- Clean gutters regularly to prevent water conditions that cause mold
- Ensure proper attic air ventilation to reduce spore-friendly conditions
- Grade soil away from foundation to prevent conditions causing moisture
Frequently Asked Questions
Is it safe to test for mold spores myself using home test kits?
While DIY mold test kits exist, they're often inaccurate about spore types and exposure levels in your air. Visual inspection for symptoms is more useful for homeowners. Professional testing provides accurate species identification and measures actual spore concentration in air conditions when needed.
How often should I inspect my home for mold symptoms and exposure risks?
Perform visual inspections monthly in high-risk areas where conditions cause growth like bathrooms and basements. Do thorough whole-house air quality inspections twice yearly - in spring and fall when conditions change. Always inspect immediately after any water damage that could cause spore growth.
Can I clean small amounts of mold spores myself without exposure risk?
Surface mold smaller than 10 square feet on non-porous materials can be cleaned with detergent and water if you protect yourself from exposure. Never use bleach on porous materials where spores penetrate. Always wear protective gear to prevent symptoms and ensure moisture conditions that cause growth are fixed first.
What's the difference between mold and mildew symptoms?
Mildew is surface fungi appearing as gray or white patches in damp air conditions, easily cleaned before spore spread. Mold penetrates deeper, appears in various colors, releases more spores into air, and causes structural damage. Both indicate moisture conditions requiring attention to prevent exposure symptoms.
Why does mold keep coming back after I clean it?
Recurring mold symptoms mean the moisture conditions that cause growth haven't been eliminated. Mold spores are always present in air; they need specific conditions to grow. Fix leaks, improve air ventilation, and reduce humidity conditions to prevent regrowth and exposure permanently.
Taking Action Against Mold
Addressing mold symptoms promptly can keep your home's air safe and prevent health conditions from spore exposure. Detecting mold prevents expensive remediation and protects your family from exposure symptoms. Regular inspections, especially after water events or when conditions change, catch problems while manageable. Remember, spores need moisture conditions to survive - controlling humidity and fixing what causes leaks promptly prevents most air quality issues. Be proactive by learning to spot symptoms before spores spread through your air and cause health conditions. Staying vigilant for mold symptoms helps maintain safe air quality and prevents exposure in your home environment. If you discover symptoms during your inspection, don't panic. Small amounts can often be managed with proper cleaning and fixing conditions that cause growth. However, extensive spore growth or mold in HVAC systems affecting air quality requires professional intervention. Contact restoration professionals for assessment if you're unsure about exposure severity or safety of spores in your home. It's essential to understand mold symptoms and what conditions cause them to take preventive measures against exposure. Acting quickly upon identifying symptoms can prevent serious health conditions from spore exposure arising. For properties with water damage or persistent moisture conditions, professional 24-hour response teams prevent spores before they start. Teams serving Pennsylvania and surrounding regions provide comprehensive moisture control and water extraction that stops conditions causing mold growth at the source.Categories
Need Restoration Services?
Our team is available 24/7 for emergency response. Call us today for a free phone consultation.


Questions About Restoration?
Our experts are ready to help. Contact us for a free consultation.