The Advanced DRI restoration team brings decades of combined field experience to every project. Our IICRC-certified technicians respond 24/7 to water, fire, mold, and storm damage events across New York, New Jersey, Pennsylvania, and Connecticut.
A tiny crack in bathroom caulk can rot subfloor and grow mold for years before you notice. Advanced DRI explains what to look for and how to fix it.
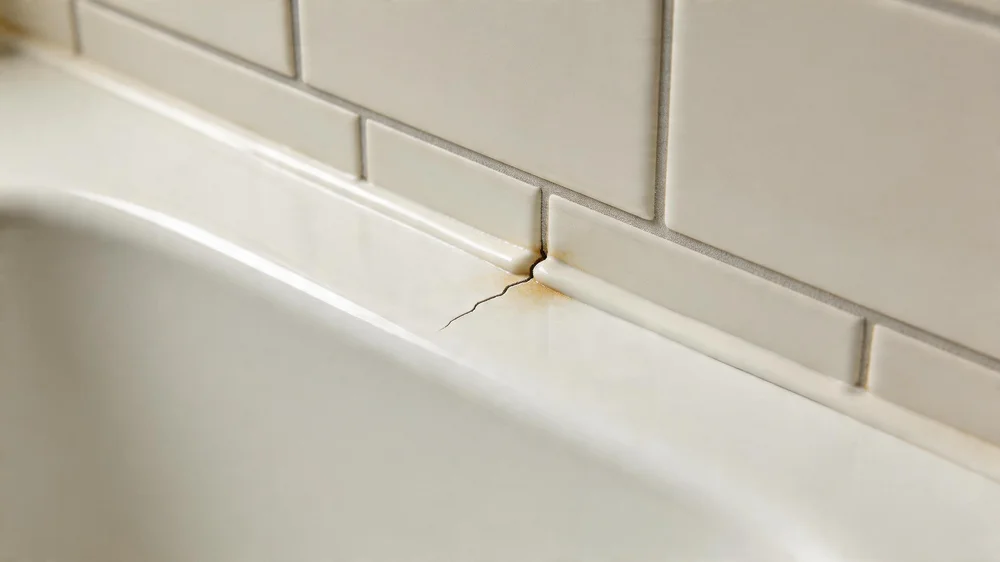
If you asked a homeowner to list the top threats to their home, almost nobody would put “bathroom caulk” on the list. But at Advanced DRI, failed caulk is one of the top five causes of hidden, long-term water damage we find — and it’s almost always worse than anyone expects, because the water has been seeping in slowly for months or years before the homeowner realizes it.
The good news is that caulk is cheap, easy to replace, and catching the problem early can save thousands in subfloor, drywall, and tile work.
Why Caulk Matters So Much
Tile, tubs, and surrounds are rigid. Your house, however, is not. Foundations settle, framing shifts seasonally, and every time someone steps into a bathtub, the tub flexes slightly under their weight. Caulk fills the tiny gaps between rigid surfaces and accommodates that movement.
When caulk fails, water doesn’t gush out — it wicks. Every shower, every bath, every splash from the sink, a small amount of water creeps behind the tile or under the tub flange. In a properly sealed bathroom that water has nowhere to go. In a compromised one, it soaks into wood framing, paper-backed drywall, and OSB subfloor.
Where Caulk Fails First
The Tub-to-Tile Joint
The most common failure point. The tub moves slightly every time it’s filled with water, the caulk fatigues, and eventually cracks in the corner or along the length.
The Tub-to-Floor Joint
Where the tub meets the flooring. Often hidden behind a skirt or tight against baseboards, but the most destructive when it fails because water rolls straight under the tub onto the subfloor.
Shower Corners
Vertical corners in tile showers flex more than flat planes do. Caulk cracks here first, usually at the very bottom where it meets the pan.
Around the Faucet and Spout
The trim plates behind handles and spouts are supposed to be sealed against the wall. As they age, the caulk hardens and shrinks, leaving a gap that drains water straight into the wall cavity.
Toilet Base
Caulk around the toilet base is often code-required, but many homeowners skip it or remove it to check for leaks. A missing bead here lets mop water and overflow spread under the toilet where you can’t see it.
Warning Signs Your Caulk Is Failing
- Cracks, gaps, or missing chunks anywhere along the bead
- Discoloration — yellowing, pink, orange, or black staining
- Caulk pulling away from the tile or tub, even if you can’t see a crack yet
- Soft spots in the flooring in front of or beside the tub
- Musty smell when you first enter the bathroom
- Staining on the ceiling of the room below a second-floor bathroom
- Loose tiles near the tub or shower floor
- Peeling paint or bubbling drywall on the outside of the tub wall
The Hidden Damage: What We Usually Find
When we open up a bathroom where caulk has been failing for a while, the damage is rarely limited to what the homeowner reported. Typical findings include:
- Water-stained or rotted OSB subfloor under the tub
- Black mold on the back side of drywall behind the tub surround
- Compromised floor joists, especially in the corner where the tub meets an exterior wall
- Ceiling damage in the room below, often visible as a faint ring or bulge
- Delaminated flooring in front of the tub, held together only by the vinyl or tile surface
If any of that sounds familiar, it’s time to call in professionals for water damage restoration and potentially mold remediation before you resurface anything cosmetic.
How to Recaulk — The Right Way
For DIYers, here’s the short version. If the caulk is just cracked and you don’t see any soft spots or staining, this is a weekend project.
- Remove all the old caulk. Use a plastic scraper and a caulk removal tool. Don’t leave any behind — new caulk will not adhere to old caulk.
- Clean and dry the joint completely. Rubbing alcohol works well. The area must be bone dry.
- Fill the tub with water before caulking the tub-to-tile joint. This stretches the joint to its widest point. When you drain the tub, the bead compresses instead of stretches, which dramatically extends its life.
- Use 100% silicone caulk rated for kitchen/bath. Not latex, not painter’s caulk. Silicone handles mildew and water exposure far better.
- Apply a thin, continuous bead. Tool it smooth with a wet finger or a caulking tool. Let it cure for the full time on the tube — usually 24 hours — before getting it wet.
When to Call a Professional
Recaulking is a fine homeowner project. Repairing the damage that failed caulk caused is usually not. Call us if:
- You see any staining on the ceiling below the bathroom
- The flooring is soft, spongy, or buckling
- You smell mold or see black staining behind the tub
- Tiles are loose, cracked, or shifting
- You’ve recaulked before and the problem keeps coming back (that usually means water is getting in elsewhere)
Ready for Help?
If you suspect long-term water damage in your bathroom — or you’ve started a recaulk project and discovered more than you bargained for — contact Advanced DRI today. Our team can assess moisture levels, identify hidden damage with thermal imaging, and scope a repair plan before small problems become gut renovations.
Frequently Asked Questions
How often should bathroom caulk be replaced?
Plan on inspecting it every year and fully replacing every 3 to 5 years. High-use bathrooms or homes with hard water may need it sooner. If you ever see a crack, replace it immediately — don’t wait.
Can I just caulk over old caulk?
No. Silicone caulk does not adhere to cured silicone. You’ll end up with a thin skin that peels off in weeks. Always remove the old bead completely before applying new caulk.
Is there a difference between grout and caulk?
Yes, and it matters. Grout goes between tiles on the same plane and is rigid. Caulk goes at changes of plane (corners, where tile meets tub, where tile meets the floor) and is flexible. Using grout where caulk belongs guarantees cracks and water intrusion within a year.
Categories
Need Restoration Services?
Our team is available 24/7 for emergency response. Call us today for a free phone consultation.

Questions About Restoration?
Our experts are ready to help. Contact us for a free consultation.