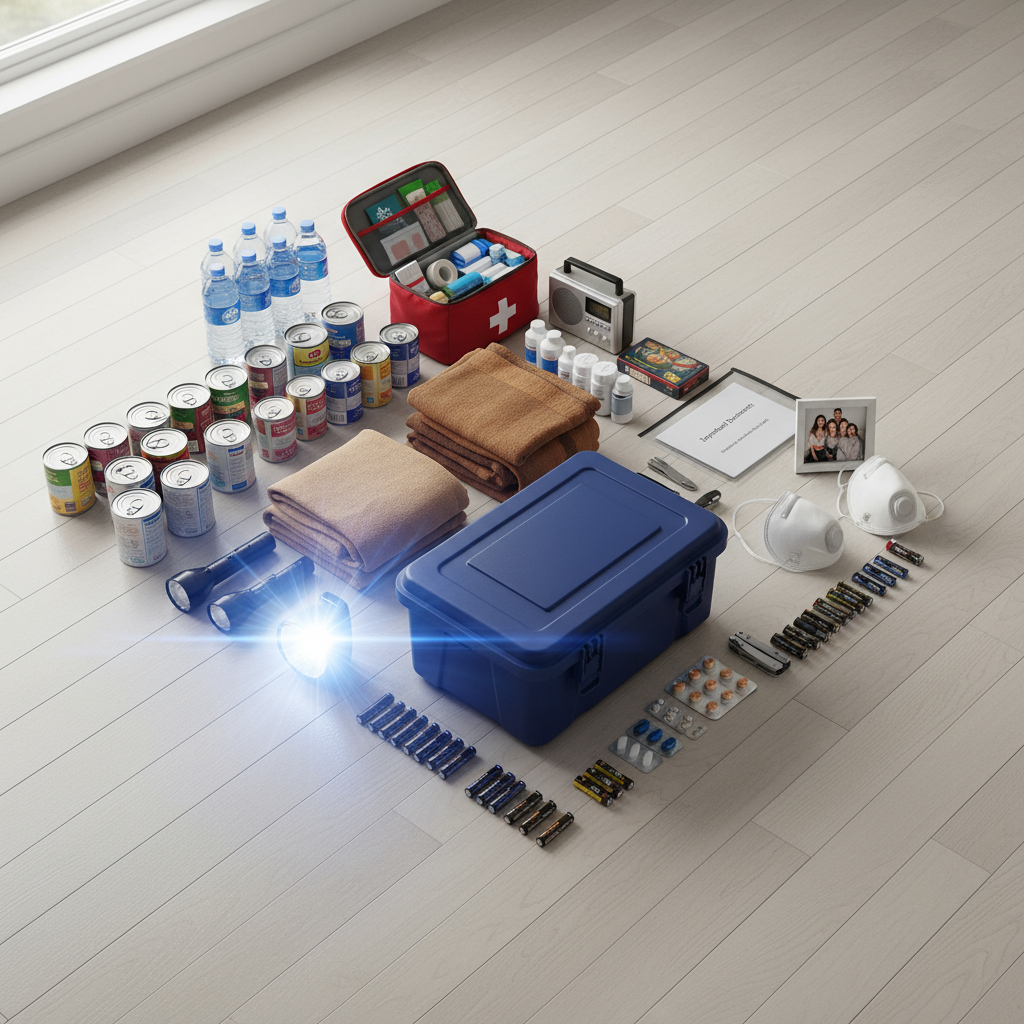
What You’ll Need
Containers:
- Large waterproof storage bin (at least 18 gallons)
- Portable backpack or duffle bag for grab-and-go items
- Waterproof document pouch
- Sealable plastic bags (various sizes)
Shopping List Categories:
- Water and food supplies (3-day minimum)
- First aid and medications
- Tools and safety items
- Communication devices
- Personal care items
- Important documents (copies)
Time Required:
⏱️ Planning: 30 minutes
⏱️ Shopping: 1-2 hours
⏱️ Assembly: 30-45 minutes
⏱️ Documentation: 30 minutes
Safety First
⚠️ Before you begin:
- Check expiration dates on all food and medications
- Store kit in easily accessible location
- Ensure all family members know kit location
- Keep matches and lighters away from children
- Test all battery-powered devices
Step-by-Step Instructions for Your Emergency Disaster Kit
Step 1: Plan Your Emergency Disaster Kit Contents Based on Family Needs
Start by assessing your family’s specific needs for the emergency disaster kit. Count the number of people, note any special medical requirements, and consider pets when planning your emergency disaster kit.
| Family Member | Special Needs | Required Items | Quantity |
|---|---|---|---|
| Adults | Medications, prescriptions | 7-day supply minimum | Per person |
| Children | Formula, diapers, comfort items | 3-day supply | Per child |
| Elderly | Medical equipment, medications | Backup supplies | As needed |
| Pets | Food, medications, carriers | 3-day supply | Per pet |
💡 Tip: Take photos of prescription labels for documentation and easier refills during emergencies.
Step 2: Assemble Water and Food Supplies
- Calculate water needs: One gallon per person per day (3-day minimum)
- Store water properly: Use sealed containers or purchase bottled water
- Select non-perishable foods: Choose items that don’t require cooking
- Include a manual can opener: Essential for canned goods
- Pack disposable plates and utensils: Conserves water during emergencies
✅ Success Check: Your water supply should be easily portable and foods should have expiration dates at least 6 months away.
Step 3: Prepare First Aid and Medical Supplies
- Start with a basic first aid kit: Purchase pre-made or build your own
- Add prescription medications: Include 7-day supply in original containers
- Include over-the-counter medicines: Pain relievers, antacids, anti-diarrheal
- Don’t forget glasses/contacts: Pack spare pairs if needed
- Add special medical items: Hearing aid batteries, insulin supplies, etc.
⚠️ Important: Rotate medications every 6 months to prevent expiration. Set calendar reminders for rotation dates.
Step 4: Gather Tools and Safety Equipment
- Flashlights and batteries: One per person plus extras
- Battery-powered or hand-crank radio: For emergency broadcasts
- Multi-tool or Swiss Army knife: Versatile for many situations
- Whistle: For signaling help
- Dust masks or N95 respirators: Protection from contaminated air
- Plastic sheeting and duct tape: For shelter-in-place situations
🔧 Pro Tip: Store batteries separately from devices to prevent corrosion damage. Use a small container labeled with battery types.
Step 5: Organize Important Documents
- Make copies of vital records: IDs, insurance policies, bank info
- Photograph important documents: Store on waterproof USB drive
- Include emergency contact list: Family, doctors, insurance agents
- Add cash in small bills: ATMs may not work during disasters
- Seal in waterproof pouch: Protect from water damage
✅ Success indicator: Documents are organized, accessible, and protected from water damage.
Step 6: Pack Personal Care and Comfort Items
- Hygiene supplies: Toothbrushes, soap, feminine products, toilet paper
- Change of clothing: One complete outfit per person
- Sleeping supplies: Emergency blankets or sleeping bags
- Entertainment for children: Books, games, comfort toys
- Phone chargers: Portable battery packs or car chargers

Troubleshooting Common Issues
Problem: Kit is too heavy to carry
Solution: Divide supplies between a home kit and a portable evacuation bag. Keep the most essential items in the portable bag.
Problem: Food items expire before use
Solution: Set bi-annual reminders to rotate perishables. Use and replace items during camping trips or power outages.
Problem: Not enough storage space
Solution: Use vacuum-sealed bags for clothing and blankets. Store water separately in a cool, dark location.
Problem: Family members have changing medical needs
Solution: Review and update medical supplies quarterly. Keep a checklist attached to the kit for easy updates.
When to Call a Professional
🔴 Contact restoration professionals immediately if:
- Your home suffers damage during a disaster requiring immediate restoration
- Water damage occurs from flooding or storm damage
- You discover mold growth after water intrusion
- Structural damage makes your home unsafe
- Sewage backup occurs during flooding events
- Fire or smoke damage affects your property
Having an emergency kit helps you survive the immediate crisis, but professional restoration services are essential for returning your home to safe, livable conditions after a disaster. Recent comprehensive storm damage repair services have helped countless families recover from severe weather events.
Maintenance and Storage Tips for Your Emergency Disaster Kit
Proper maintenance ensures your emergency disaster kit remains ready when needed. Regular updates keep your emergency disaster kit effective year after year.
| Task | Frequency | What to Check | Action Required |
|---|---|---|---|
| Rotate water | Every 6 months | Expiration dates, seal integrity | Replace if expired or compromised |
| Update food | Every 6 months | Expiration dates, package condition | Use and replace items |
| Test devices | Every 3 months | Batteries, flashlights, radio | Replace dead batteries |
| Review documents | Annually | Current information, new policies | Update copies as needed |
🏠 Storage Tip: Keep your main emergency disaster kit in a cool, dry place like a closet near an exit. Store a smaller version of your emergency disaster kit in your vehicle for emergencies away from home.
Additional Considerations by Disaster Type
For Hurricanes and Flooding: Include additional plastic sheeting, sandbags, and battery-powered fans. Know your evacuation route and have a full gas tank. Learn from recent storm damage experiences in Ocean County about immediate response steps.
For Winter Storms: Add extra blankets, hand warmers, rock salt, and snow shovels. Include backup heating sources (never use outdoor equipment indoors).
For Power Outages: Stock additional batteries, portable chargers, and non-perishable foods. Consider a portable generator with proper outdoor ventilation.
For Earthquakes: Include work gloves, sturdy shoes, and a crowbar. Store kit away from heavy objects that could fall.
Frequently Asked Questions
How much water should I really store for emergencies?
Store at least one gallon per person per day for three days minimum. This covers drinking and basic hygiene. Consider storing extra for pets, and more if you live in hot climates or have family members with medical conditions.
Should I buy a pre-made emergency kit or build my own?
Pre-made kits provide good basics but rarely meet specific family needs. Start with a basic pre-made kit, then customize by adding medications, special dietary items, and comfort supplies. Building your own ensures everything meets your family’s unique requirements.
Where should I store my emergency disaster kit?
Store your main emergency disaster kit in an easily accessible, cool, dry location like a hall closet near an exit. Avoid basements that could flood or attics that are hard to access. Keep smaller kits in your car and workplace too.
How often should I update my emergency disaster kit supplies?
Review and refresh your emergency disaster kit every six months—when you change clocks for daylight saving time is a good reminder. Replace expired food and medications, update documents, test batteries, and adjust clothing for growing children or seasonal changes.
What’s the most common mistake people make with emergency disaster kits?
Forgetting to maintain the emergency disaster kit after creating it. Batteries die, food expires, and children outgrow clothes. The second biggest mistake is making it too heavy to carry during evacuation. Create both a comprehensive home kit and a lighter go-bag.
Take Action Today on Your Emergency Disaster Kit
Creating an emergency disaster kit is one of the most important steps you can take to protect your family. Start building your emergency disaster kit today—even a basic kit is better than none. Remember to customize your emergency disaster kit for your family’s specific needs, maintain it regularly, and ensure everyone knows where it’s stored.
While your emergency disaster kit helps during the immediate crisis, recovering from disaster damage requires professional help. Understanding why quick response time is crucial in disaster restoration can help you act fast when emergencies strike. If your home suffers water damage, fire damage, or other disaster-related problems beyond what your emergency disaster kit can handle, contact restoration professionals immediately.
For businesses, having essential disaster planning to safeguard your business goes beyond basic emergency kits. Homeowners in Northern New Jersey and New York City face unique challenges from coastal storms and urban emergencies.
Remember: Preparation today provides peace of mind tomorrow. Take the time now to build your emergency disaster kit—your family will thank you when disaster strikes.