What You’ll Need
Understanding the importance of DIY water extraction can greatly help in minimizing damage to your home before professionals arrive. Taking time to prepare properly ensures effective water removal.
Before we dive into the steps, let’s emphasize that DIY water extraction is crucial for minimizing water damage in your home over time.
🔧 Tools:
- Wet/dry vacuum (rent from hardware store if needed – most stores have rental policies)
- Mop and buckets (multiple 5-gallon buckets work best, available at any home store)
- Squeegee (for smooth floors in your home)
- Towels (as many as possible – store extras for emergencies)
- Fans (box fans, floor fans, any available in your home)
- Dehumidifier (if available – check store rental policy)
- Rubber gloves and boots (waterproof protection, store these at home)
📋 Materials:
- Plastic sheeting (hardware store, 6 mil thickness – check store policy for returns)
- Garbage bags (heavy-duty contractor bags from home improvement store)
- Disinfectant (bleach solution or antimicrobial cleaner to extract bacteria)
- Extension cords (outdoor-rated for safety, store properly when not in use)
- Duct tape (for securing plastic sheeting throughout your home)
⏱️ Time Required:
- ⏱️ Prep time: 15 minutes
- ⏱️ Water extraction time: 1-3 hours
- ⏱️ Initial drying setup time: 30 minutes
- ⏱️ Cleanup time: 30 minutes
⚠️ Safety First – Critical Steps
Before anything else: Turn off electricity at the breaker to the affected zone in your home – water and electricity are deadly. Close the main water valve if there’s an active leak to stop more water from entering. Always wear personal protective equipment (PPE) including waterproof gloves, rubber boots, and eye protection when you extract water.
Understanding Water Categories
Not all water damage is the same. Quick identification saves time and protects your health:
- Clean Water (Category 1): From broken supply pipes, rainwater, or appliance malfunctions – safe for DIY extraction if you act within 24 hours time
- Gray Water (Category 2): From washing machines, dishwashers, or clean toilet overflows – contains some contamination, use caution
- Black Water (Category 3): From sewage backups, flooding, or standing water over 48 hours – STOP! Do not attempt DIY. This is hazardous and requires professional handling per health policy.
⚠️ If it’s black water (sewage, flood water), do not attempt DIY extraction – call professionals immediately to protect your home and health.

Step-by-Step Water Extraction Process
By following these steps for DIY water extraction, homeowners can take proactive measures to protect their home over time.
Step 1: Stop the Water Source
Implementing effective DIY water extraction techniques in your home can prevent mold growth if done in time.
- Locate and shut off the main water valve in your home if the leak is from plumbing.
- Clear gutters and drains if water is entering your home from outside.
- Place buckets under active leaks you can’t stop (store extras for future use).
- Use tarps or plastic sheeting to divert incoming water and extract time from damage.
✅ Success indicator: No new water is entering the affected area of your home.
Step 2: Document and Protect
- Take photos and videos before moving anything (insurance policy requirement).
- Move furniture to dry areas of your home or elevate on blocks.
- Remove area rugs from your home and take them outside.
- Pick up items from the floor (books, electronics, papers) and store safely.
💡 Pro Tip: Place aluminum foil or plastic wrap under furniture legs to prevent staining on wet carpet in your home while you extract water.
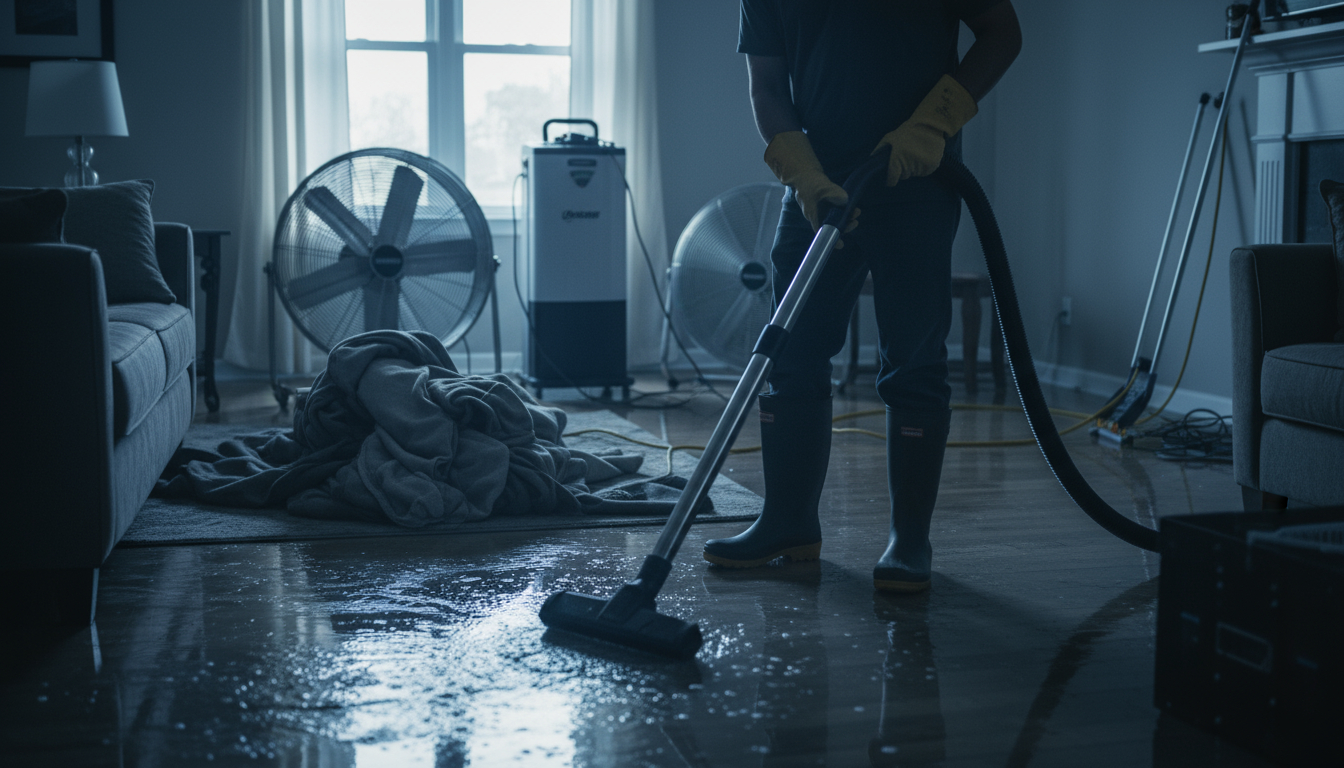
Step 3: Quick Water Removal
- Use a shop-vac or wet/dry vacuum as your primary tool to extract water from the deepest areas of your home.
- Deploy towels and mops for surface water that the vacuum can’t reach – wring them out frequently.
- Apply squeegees on hard floors to push water toward drains or vacuum zones for faster extraction.
- Lift saturated carpets and underlay immediately – these hold water like sponges and rarely dry properly without professional equipment.
- Move furniture to dry areas and place aluminum foil or plastic sheeting under legs to prevent moisture wicking and staining.
- Work systematically from one end of the room to the other, taking time for thoroughness.
⚠️ Important: Act fast – the longer water sits, the more it penetrates into materials. Extract as much as possible within the first hour for best results in your home.
After 2-4 hours time of DIY water extraction, check for remaining moisture levels in your home.
| Water Depth | Best Tool to Extract | Time Estimate | DIY Feasible? |
|---|---|---|---|
| Surface moisture | Towels, mop (store dry ones) | 30-60 minutes time | Yes – Easy for home |
| 1/4 – 1 inch | Wet/dry vacuum to extract | 1-2 hours time | Yes – Moderate |
| 1-2 inches | Wet/dry vacuum + squeegee | 2-4 hours time to extract | Yes – Difficult |
| Over 2 inches | Professional pumps | Call pros (check policy) | No – Unsafe for home |
Step 4: Remove Wet Materials
Removing wet materials is a key part of any DIY water extraction process in your home, saving time later.
- Pull up carpet padding – it cannot be saved once soaked (insurance policy may cover replacement).
- Cut carpet into manageable strips (4-foot wide) if disposing from your home.
- Remove baseboards carefully if water reached them over time.
- Drill small holes at the base of walls to extract and release trapped water.
- Bag and remove any unsalvageable items from your home immediately (store salvageable items properly).
✅ Success indicator: All standing water is extracted and wet materials are out of your home or drying.
Step 5: Ventilation and Drying
Proper drying prevents mold growth – this is critical for your home’s safety over time.
- Set up box fans and dehumidifiers to create cross-ventilation throughout affected areas.
- Target below 60% relative humidity (RH) – ideally maintain 30-50% RH to extract moisture effectively.
- Position fans strategically – angle at 45 degrees toward walls and floors, but WARNING: Do not blow air directly into wet wooden panels or wall cavities without moisture control, as this can trap moisture deeper.
- Open windows and doors only if outdoor humidity is lower than indoor levels.
- Monitor progress – if you don’t have a moisture meter, be cautious about assuming areas are dry.
- Run equipment continuously for at least 72 hours time, checking and emptying dehumidifiers regularly.
Hidden Moisture Cavities – The Danger Zones
Critical areas where moisture hides in your home:
- Wall cavities: Water travels inside walls through capillary action – you can’t see it but it’s there
- Under flooring: Subfloors and floor joists trap moisture, creating perfect mold conditions
- Behind baseboards: Water wicks up behind trim and baseboards, staying hidden for weeks
- Inside cabinets: Particularly under sinks where water damage often goes unnoticed
- Ceiling cavities: If water came from above, check between floors carefully
⚠️ Without a moisture meter, assume these areas are wet if water was nearby. Professional equipment is needed to properly extract and dry these hidden spaces in your home. Guessing wrong leads to mold within 48-72 hours time.
Step 6: Clean Without Causing More Damage
Important chemical safety for your home:
- DO NOT use bleach on porous materials (wood, drywall, carpet) – it doesn’t penetrate to kill mold roots and can damage materials further.
- Focus on mechanical removal – physically remove contaminated materials rather than trying to “clean” them with chemicals.
- For hard surfaces only (tile, sealed concrete, plastic), use a mild detergent solution – save antimicrobial treatments for professionals who have proper products and application methods.
- Dry thoroughly – moisture is the enemy, not the lack of chemicals. Proper drying over time prevents more issues than any cleaning product.
- Dispose properly – bag wet materials in sealed bags before removing from your home to prevent spore spread.
💡 Remember: Your goal is to extract water and dry your home, not to sanitize everything. Leave antimicrobial and professional-grade treatments to restoration experts who have the right equipment and EPA-registered products per policy requirements.

Troubleshooting Common Issues
Problem: Wet/dry vacuum keeps shutting off
Solution: The float valve is activating because the tank is full. Empty more frequently to extract efficiently or check if the filter is clogged with debris from your home.
Problem: Water keeps coming back
Solution: You haven’t found the source in your home. Check for foundation cracks, window leaks, or ongoing plumbing issues. This often requires professional detection if DIY time is limited.
Problem: Can’t move heavy furniture
Solution: Place aluminum foil or plastic blocks under legs to prevent damage to your home. Focus on extracting water around items you can’t move and store lighter items elsewhere.
Problem: Strong musty smell developing
Solution: This indicates mold growth starting in your home. You need professional help within 24-48 hours time to prevent serious problems (check if insurance policy covers this).
Addressing mold early is vital in the DIY water extraction journey to protect your home over time.

🔴 When to Call a Professional
Stop DIY efforts and call a water damage restoration professional if:
- Water is from sewage backup or contains contaminants (policy often requires this)
- More than 2 inches of standing water present in your home
- Water has been standing for over 48 hours time
- Multiple rooms or floors are affected and extract needs exceed DIY capacity
- You smell mold or see visible growth in your home
- Electrical systems in your home have been compromised
- Walls or ceilings show signs of saturation over time
- Your insurance policy requires professional documentation
Professional teams from 24-hour emergency restoration have truck-mounted extraction units that remove water 100 times faster than consumer equipment from the store.
In many cases, DIY water extraction in your home can be a temporary solution until professionals arrive to extract remaining moisture.
Preventing Further Damage
| Time Frame | Risk Level | Action Needed | Consequence if Delayed |
|---|---|---|---|
| 0-24 hours time | Low | Extract water, start drying home | Minimal damage |
| 24-48 hours time | Medium | Professional drying needed | Mold begins growing in home |
| 48-72 hours time | High | Full restoration required (check policy) | Structural damage likely |
| 72+ hours time | Severe | Major remediation needed | Health hazards in home |
🏠 Home Tip: Keep a “water emergency kit” with towels, plastic sheeting, and a wet/dry vacuum ready in your home during storm season. Store these items in an accessible location and check your insurance policy coverage regularly.
Having a plan for DIY water extraction will help you manage any water emergency in your home effectively over time.
Frequently Asked Questions
Can I use my regular home vacuum to extract water?
Never use a regular home vacuum to extract water – it will cause electrocution or destroy the motor. Only use vacuums specifically labeled as wet/dry or shop vacuums designed for water extraction. These are available at most hardware stores, and many stores offer rental policies for emergency use.
How much time should I run fans after water extraction?
Run fans continuously for at least 72 hours time after extraction in your home. However, if moisture meters still show high readings after this time, continue running them and consider calling professional water extraction specialists. Your insurance policy may cover extended drying time if documented properly.
Is water from a broken pipe safe to extract myself?
Clean water from supply pipes in your home is generally safe for DIY extraction if you act within 24 hours time. After 48 hours, even clean water becomes contaminated and requires professional handling per most insurance policy guidelines.
When dealing with clean water in your home, DIY water extraction can often be safely handled by homeowners who take time to follow proper procedures.
What’s the biggest mistake homeowners make during water extraction?
Not taking time to extract enough moisture from hidden areas like inside walls and under flooring in your home. This trapped moisture causes mold within 48 hours time, requiring expensive remediation later. Store fans and dehumidifiers strategically to address these hidden areas.
One of the biggest challenges in DIY water extraction is taking adequate time to address hidden moisture throughout your home.
Should I turn on heat in my home to speed up drying?
Only raise temperature in your home to 70-75°F. Higher heat without proper dehumidification over time creates perfect conditions for mold growth. Focus on air movement to extract moisture instead. Check your HVAC policy or manual for water damage operation guidelines.
Understanding the right conditions can enhance your DIY water extraction effectiveness in your home over time.
Taking Action Against Water Damage
Quick DIY water extraction can save thousands in restoration costs and prevent long-term damage to your home. The key is acting fast, working safely, and knowing your limits. Take time to extract water properly, and store emergency supplies for future incidents. While these steps help minimize immediate damage, remember that water you can’t extract or see often causes the biggest problems in your home.
Quick and effective DIY water extraction is critical to preventing long-term damage to your home when time is of the essence.
For significant water damage or if you’re unsure about safety, don’t hesitate to contact restoration professionals who can extract water comprehensively from your home.
Remember, your homeowner’s insurance policy often covers professional water extraction and restoration. Acting quickly with DIY extraction helps protect your home, but professional intervention within 24-48 hours time provides the best protection against lasting damage and mold growth. Check your policy details and store important contact numbers for emergencies.